travel tips

Thirty-Three Nifty United States

Did you have to learn the names of all 50 states when you were a kid? In my elementary school, one of our favorite songs was “Fifty Nifty”, where we sang all the states in alphabetical order. As an adult, I’ve met other adults from other schools who also still know “Fifty Nifty” by heart. While I’m not going to sing it to you, I am going to list all of the states from my home country and tell you a bit about which ones I’ve been to.

Alabama- Haven’t been there yet.

Alaska- I’d love to, but it’s difficult to get there.

Arizona- I don’t remember my first time in Arizona because I was a baby. Apparently, I went to the Grand Canyon then, but visiting again when I was 29 was much more memorable. Other than Mexico, it’s the closest out-of-state destination from where I currently live, so I’ve also been just to see random roadside attractions.

Arkansas- I took a “get to know you” trip with two coworkers when I worked in Kansas City. We decided on Northwest Arkansas because it was somewhat nearby, yet none of us had been there before. I was pleasantly surprised that “The Natural State” lives up to its name.

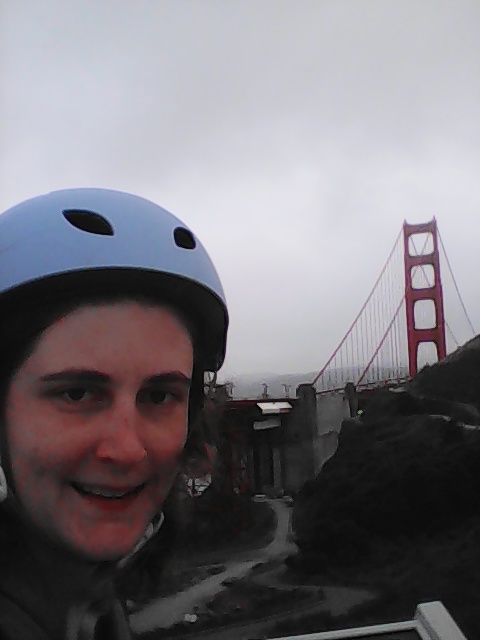
California- I currently live here! I also lived here between the ages of one and three. And because I have lots of relatives in this state, and California itself is a good vacation destination, I’ve spent a lot of time throughout my life in this state.

Colorado- Ever since I was a kid, I dreamed of living there, particularly in Colorado Springs. I visited a couple times as an adult to places like Boulder, Denver, and Estes Park, but in 2020, I got to temporarily live my dream by spending a month in the Springs. 

Connecticut- Nope, haven’t been there.

Delaware- During my high school’s East Coast trip, I rode a bus through a small part of Delaware while going between DC and Philadelphia. I don’t even know if that should count. What do you think?

Florida- Every kid’s dream: I got to go to Walt Disney World. In fact, I went to Walt Disney World four times before taking a Florida trip to someplace other than Disney. As it turns out, Fort Lauderdale is a great place to kick off a cruise vacation.

Georgia- I’ve made plans, but none of them have stuck yet.

Hawaii- I went to Oahu when I was nine and Maui when I was twenty-eight. I think I preferred Maui, just because it wasn’t as much about city life as Honolulu was. Each day, I took a trip to a different part of the island that provided diverse landscape.

Idaho- I’ve made the joke that Idaho doesn’t exist. However, for a nonexistent state, I’ve been there a few times, mostly on choir tours or other road trips. However, I’ve seen very few potatoes there.

Illinois- My experience with Illinois has mostly been just driving through. However, on my last drive through Illinois, I spent a jam-packed day in Chicago, doing everything from seeing my reflection in the Cloudgate Bean to standing on the see-through 103rd-floor ledge of the Willis Tower.

Indiana- Illinois was often paired with Indiana for driving through. So I’ve mostly made roadside attraction stops in this state, such as the park where Johnny Appleseed was buried.

Iowa- Because I’ve lived in both Nebraska and Missouri, Iowa has made it to my list. The two most memorable parts of Iowa were the amusement park Adventureland and the sculpture park in downtown Des Moines.

Kansas- Even though I lived on the Missouri side of Kansas City, I had to drive through Kansas state to get just about anywhere. We always cheered whenever we crossed back into Missouri. It’s not too exciting of a place, and the time I crossed the entire state in one day was probably the most exhausting day of my life.

Kentucky- I only barely crossed the Ohio-Indiana-Kentucky border, but I had a great experience at the Creation Museum. Although that was my main destination, I also had fun horseback riding and sleeping in a bank vault!

Louisiana- Haven’t been there.

Maine- Nope, not yet.

Maryland- I can’t tell you much about my time in Maryland, because it was the same bus trip that brought me through Delaware. We did stop at this big rest area, though.

Massachusetts- It’s on my list of places to go.

Michigan- Despite having several housemates from Michigan, none took me to their home state.

Minnesota- I went out here three times for work trips when I lived in Nebraska. Once was just passing through on the way to Wisconsin, but the other two times were for recruiting events at Crown College.

Mississippi- No, but for some reason it was important I learned to spell it.

Missouri- My first time in Missouri was for a weekend conference. Somehow, we made it to Kansas City without ever touching Kansas state. I never would have guessed that I was going to move to Kansas City, Missouri nine years later. During my time living there, I saw a lot more of the state, but it was short-lived as I decided to move after only four months.

Montana- I’ve been to Yellowstone National Park. My sister has lived in Montana for years, and someday I need to visit her there.

Nebraska- I lived in Fremont for two years while interning, and later media managing, at my first year-round camp job. The first year, I was without a car, so my travel was limited to the mercy of coworkers willing to drive. I saw quite a bit of Omaha and a few other spots around the state, though.

Nevada- I’ve been to Reno a few times, and Las Vegas once (or twice if you count when I was two years old). But mostly, my time in Nevada has been just driving through dry, barren landscape. 

New Hampshire- I haven’t seen much of New England, including New Hampshire.

New Jersey- When my 10th grade class visited New York City, we stayed in New Jersey. Not much to recall about the state itself other than a standard hotel room and lots of traffic.

New Mexico- When I moved back west after my short-lived time in Missouri, I drove through New Mexico via Route 66. Okay, it was actually Route 40, but I did pull off to see several Route 66 attractions. 

New York- My school took a trip to New York City in 10th grade. That was a whirlwind of sightseeing. Quite a few years later, I rode a bus to Niagara Falls with a transfer in Buffalo. I think I enjoyed my time in Niagara Falls better, but it may be because I didn’t get to plan my own Manhattan schedule.

North Carolina- I’ve applied for a few jobs here, but never got to the point of visiting.

North Dakota- Nope. 

Ohio- I moved to Ohio sight unseen. To this day, I make fun of how terrible a place Ohio is, but there were a few things I liked about the state, especially interacting with the Amish in Holmes County. This was also the first time I worked at an outdoor education camp, which really shaped what I’m doing career-wise today.

Oklahoma- I’ve been twice within four months of each other. The first was an introductory trip with my new coworkers, where we stayed at an old west retreat center and played at The Gathering Place. The second time was when I was leaving that job, but because I was only driving across the panhandle in the snow, I didn’t do much sightseeing at that time.

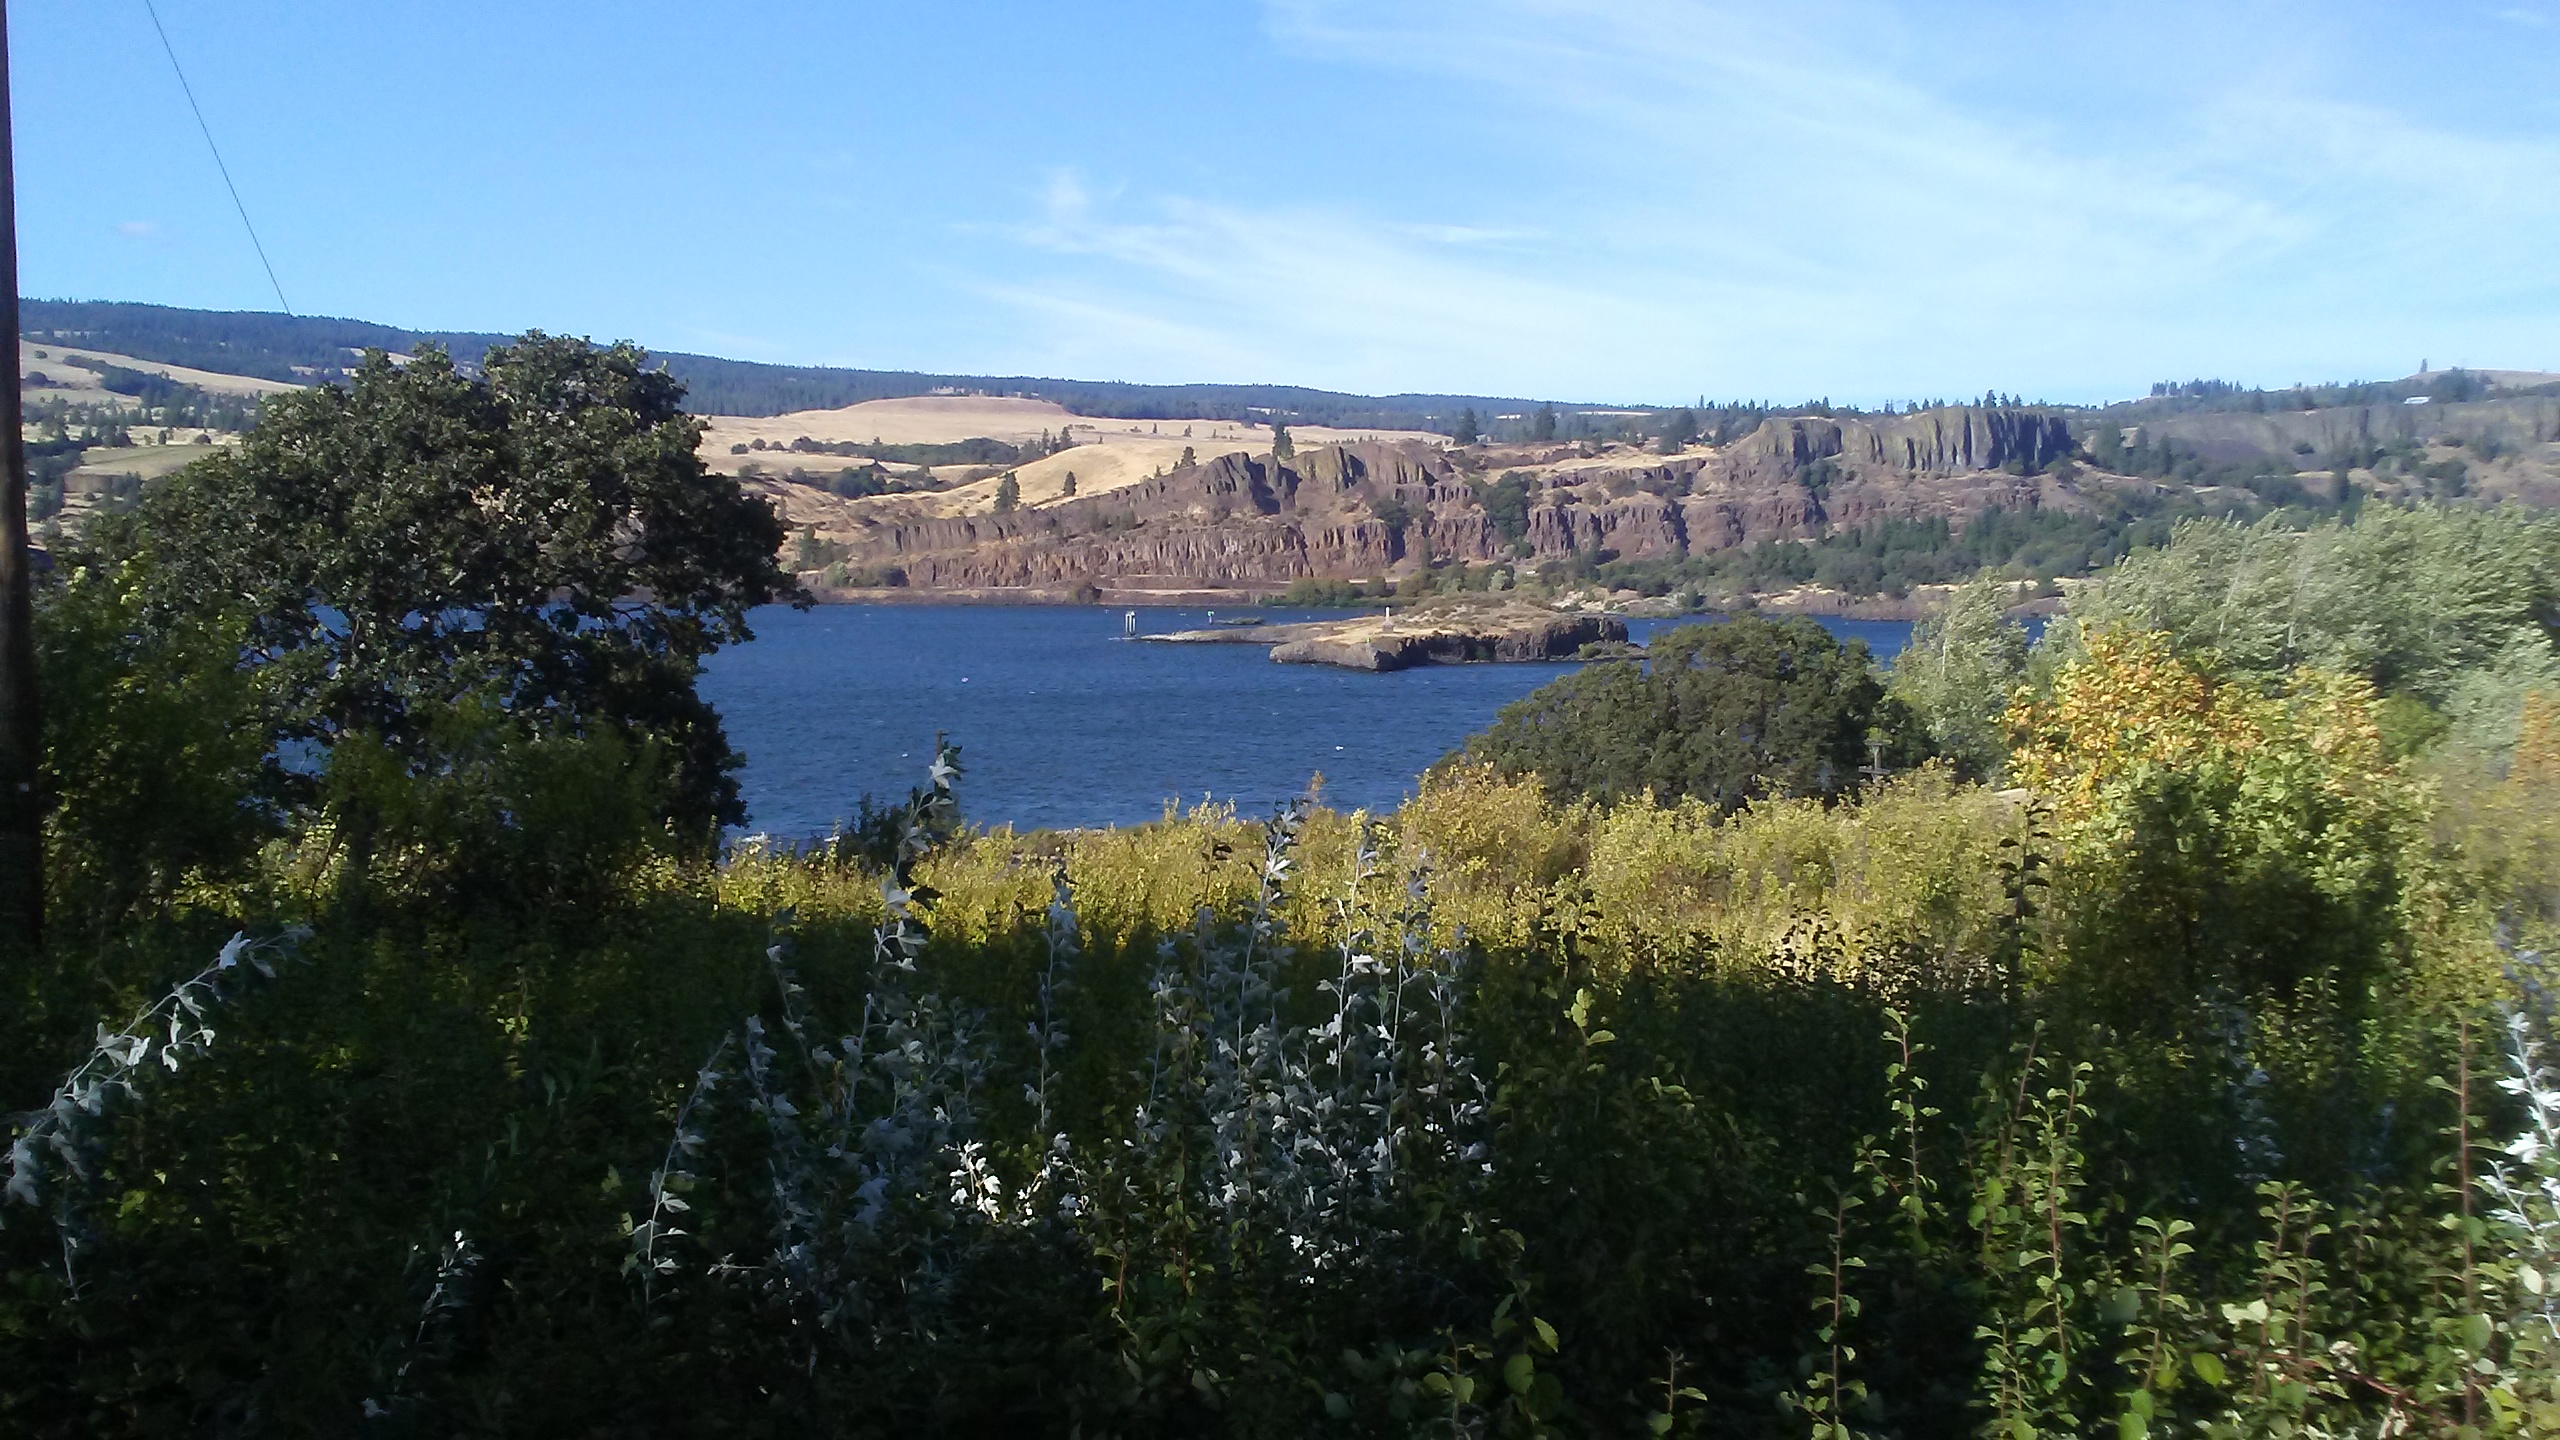
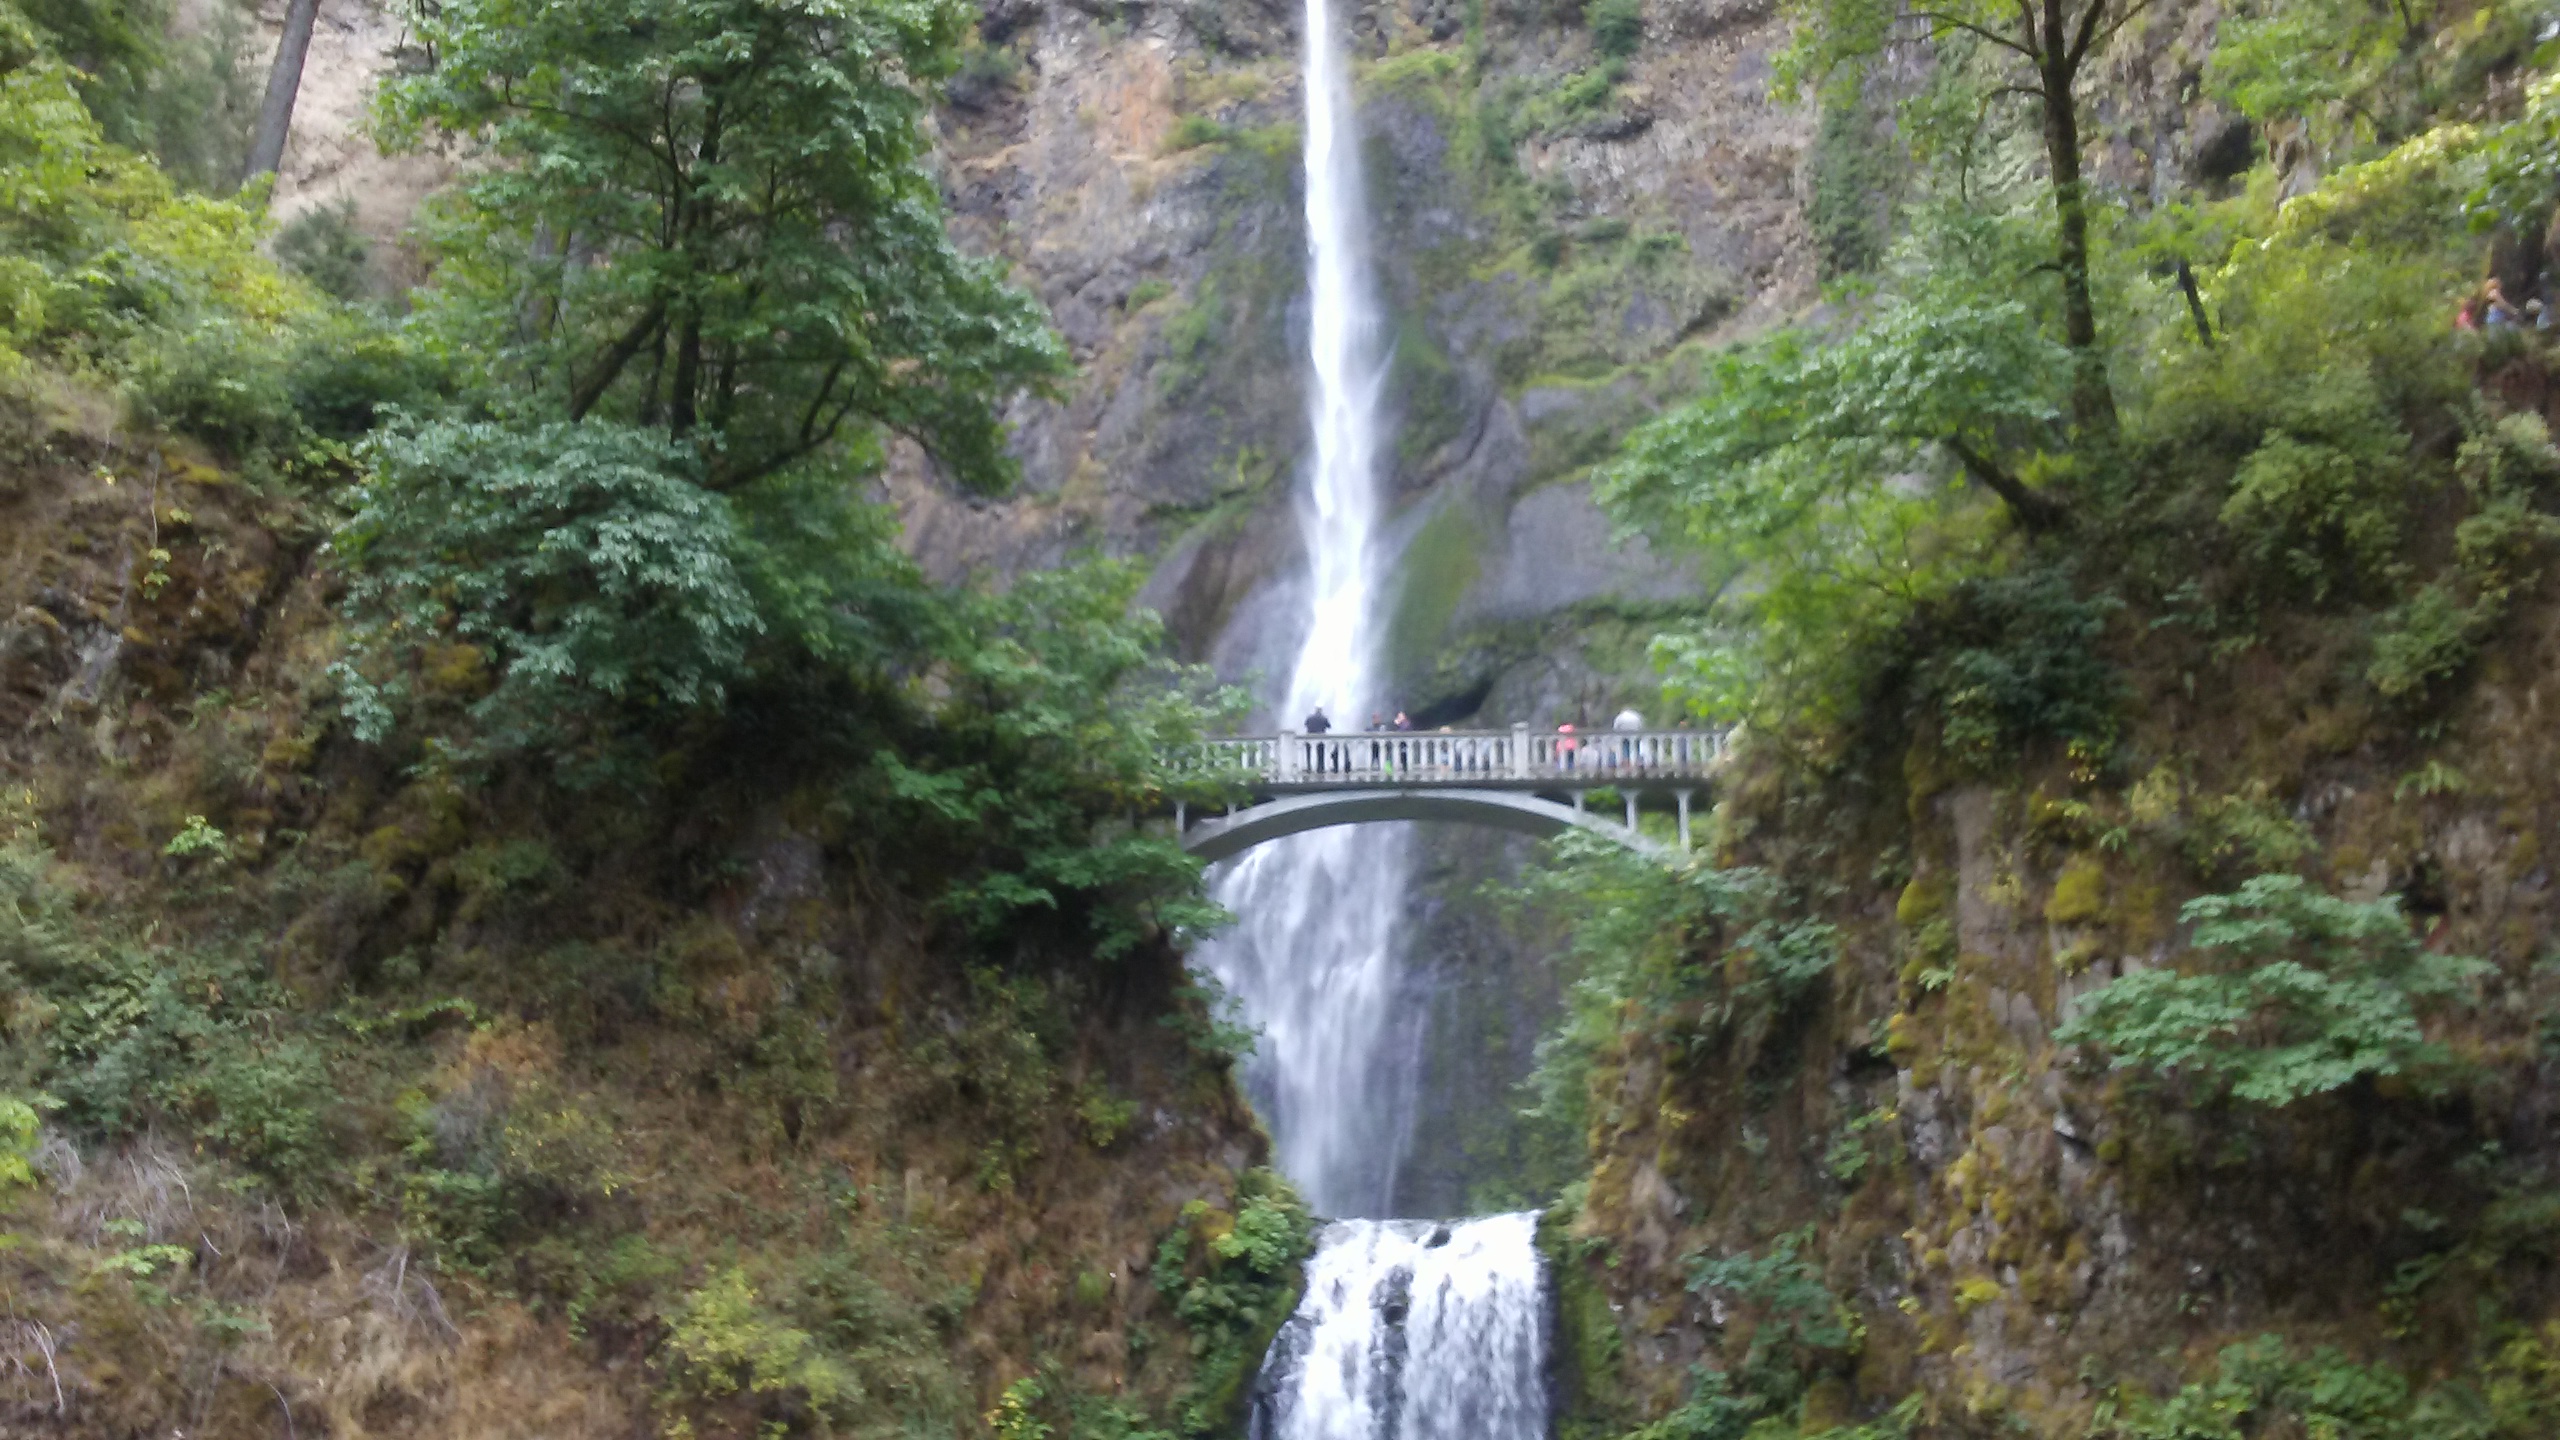
Oregon- I’ve spent more time here than any other state or country. I was born here, I went to school here from preschool through community college (fun fact: my preschool and my college were located just three blocks away from each other, but they didn’t exist at the same time), and of course, I enjoyed all kinds of road trips through the scenic landscape. I always enjoyed driving down the coast, but there was plenty to do inland as well. 

Pennsylvania- Although I haven’t been able to spend the night in this state, I’ve seen quite a decent portion of it. My 10th-grade class drove through here between DC and New York and spent a day in Philadelphia. I also rode a bus along Lake Erie.

Rhode Island- Nope. It’s not even an island.

South Carolina- I haven’t been to the Carolinas.

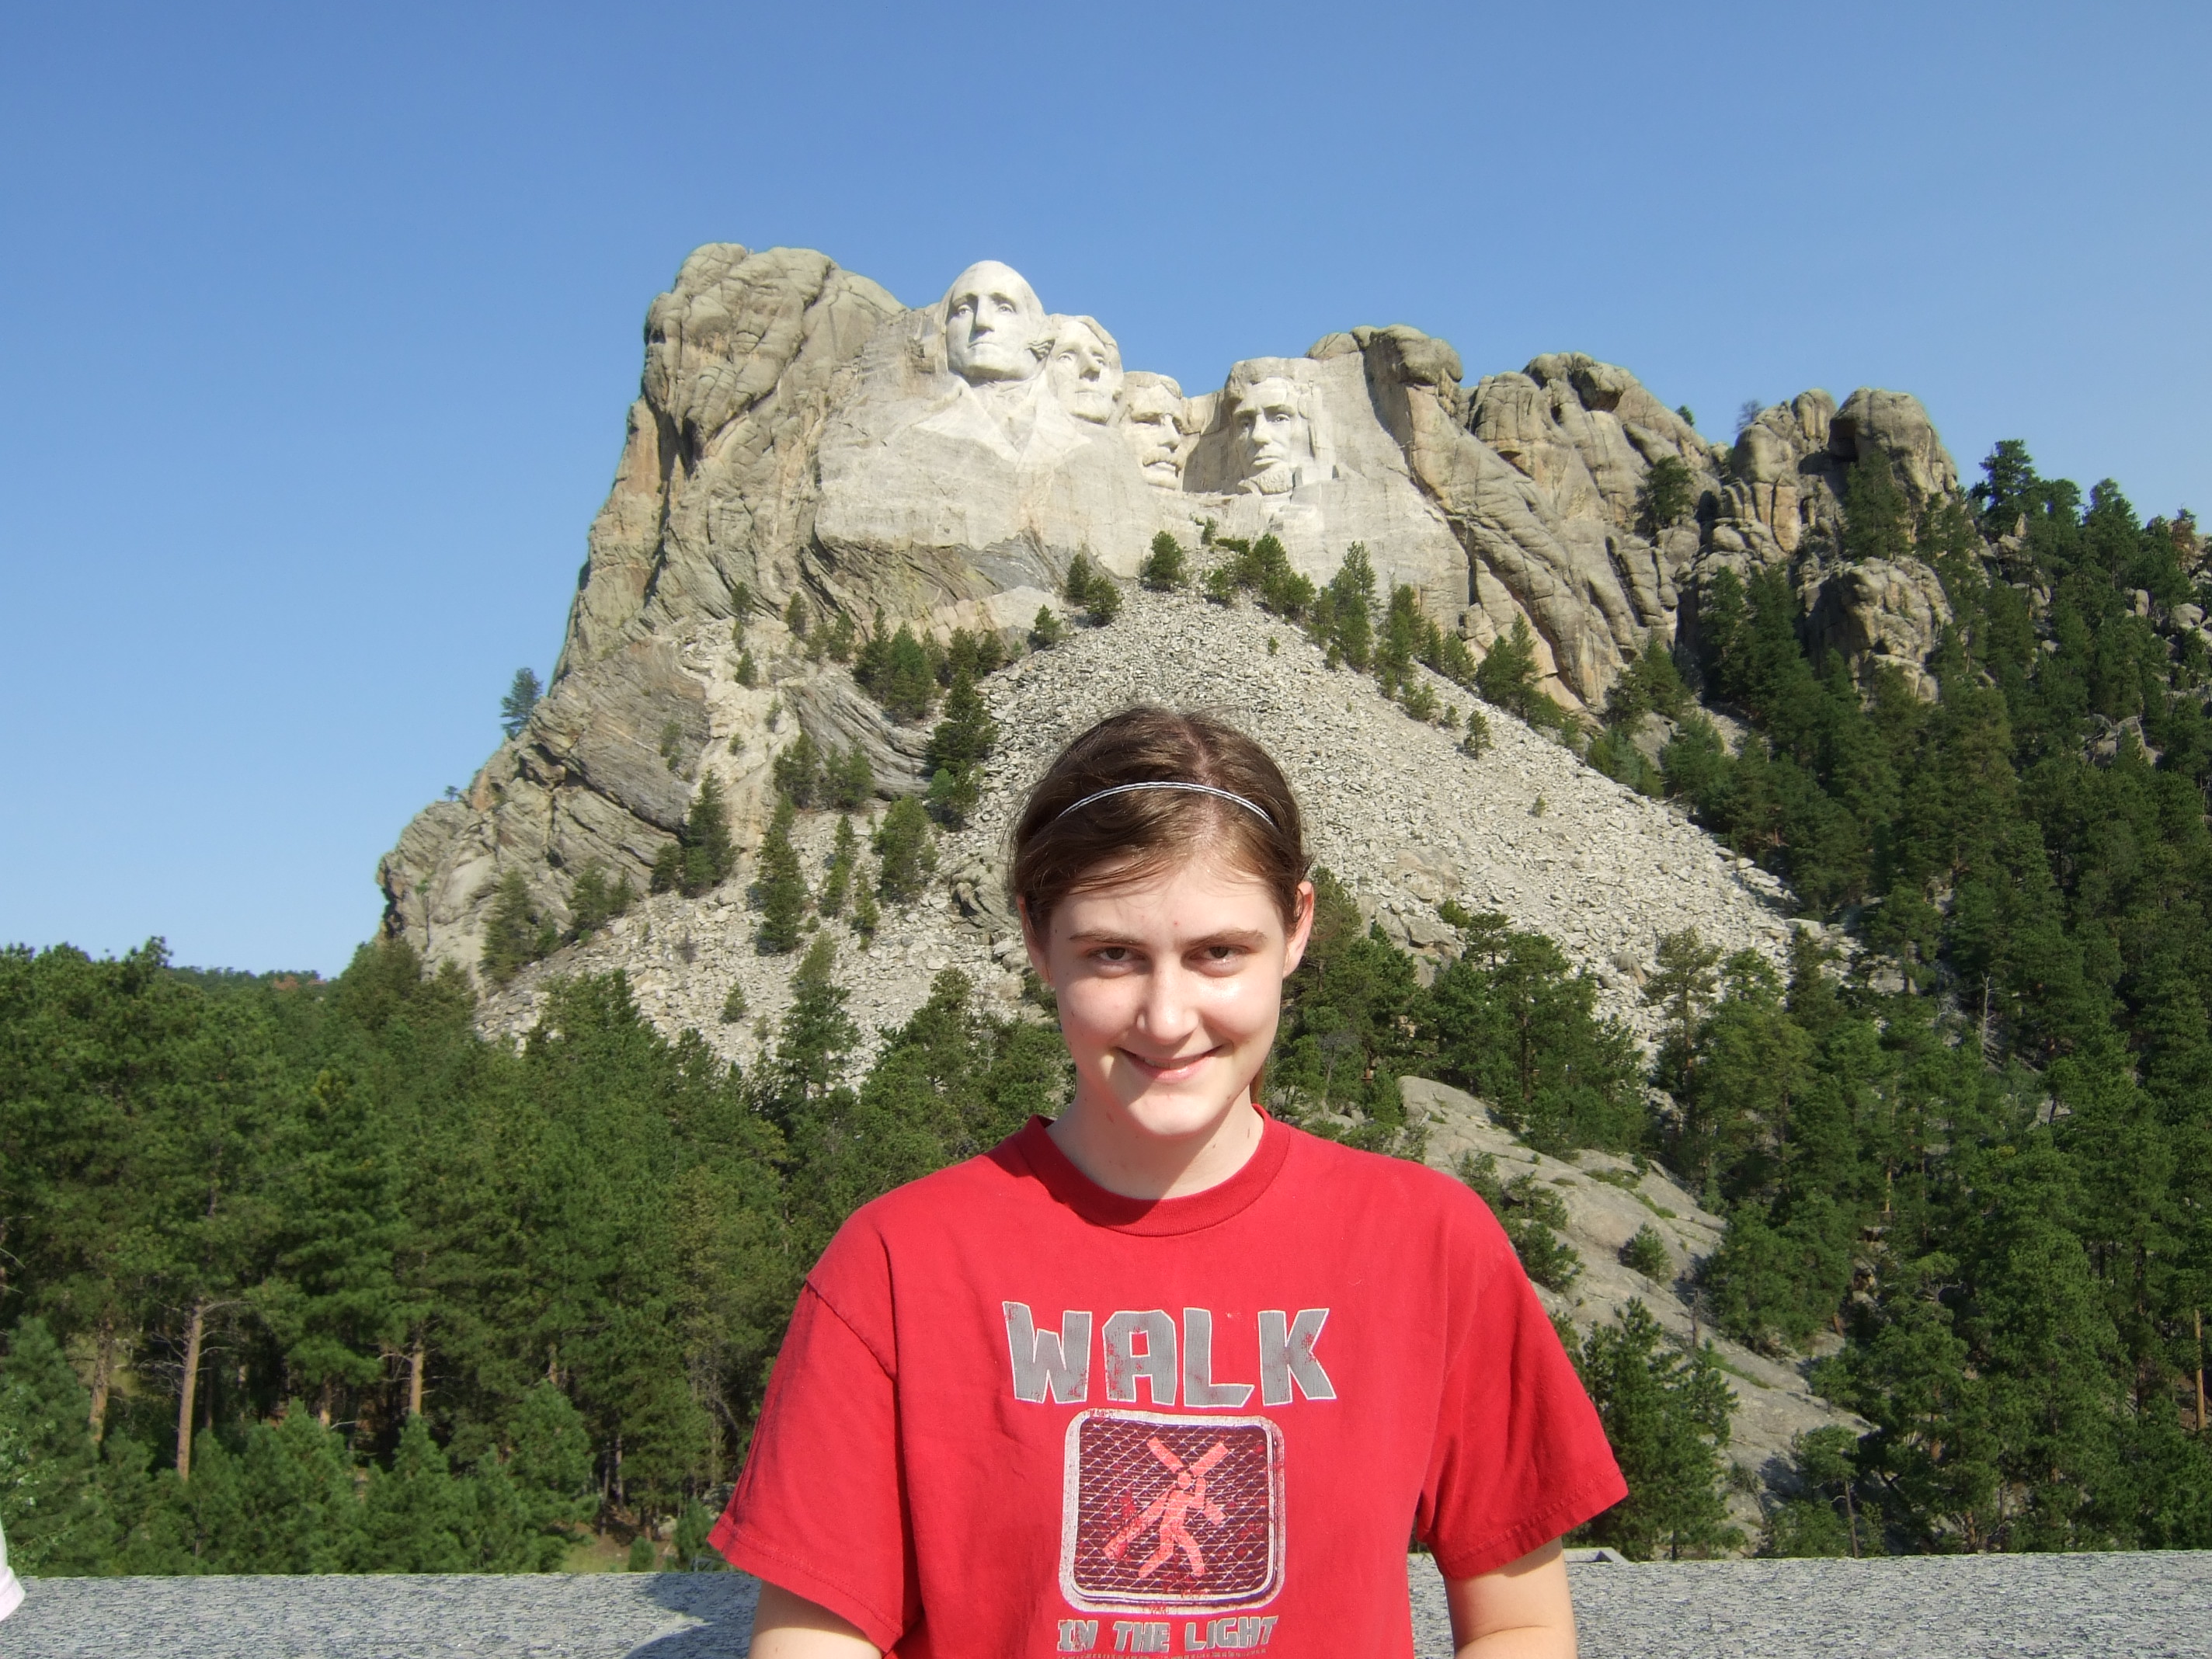
South Dakota- This state is famous for Mount Rushmore, which is where I went my first time to this state. A short time later, I was back in South Dakota for a music festival. This was all during the first month of living in Nebraska, so I thought I’d visit South Dakota a lot while living there. However, I never visited again.

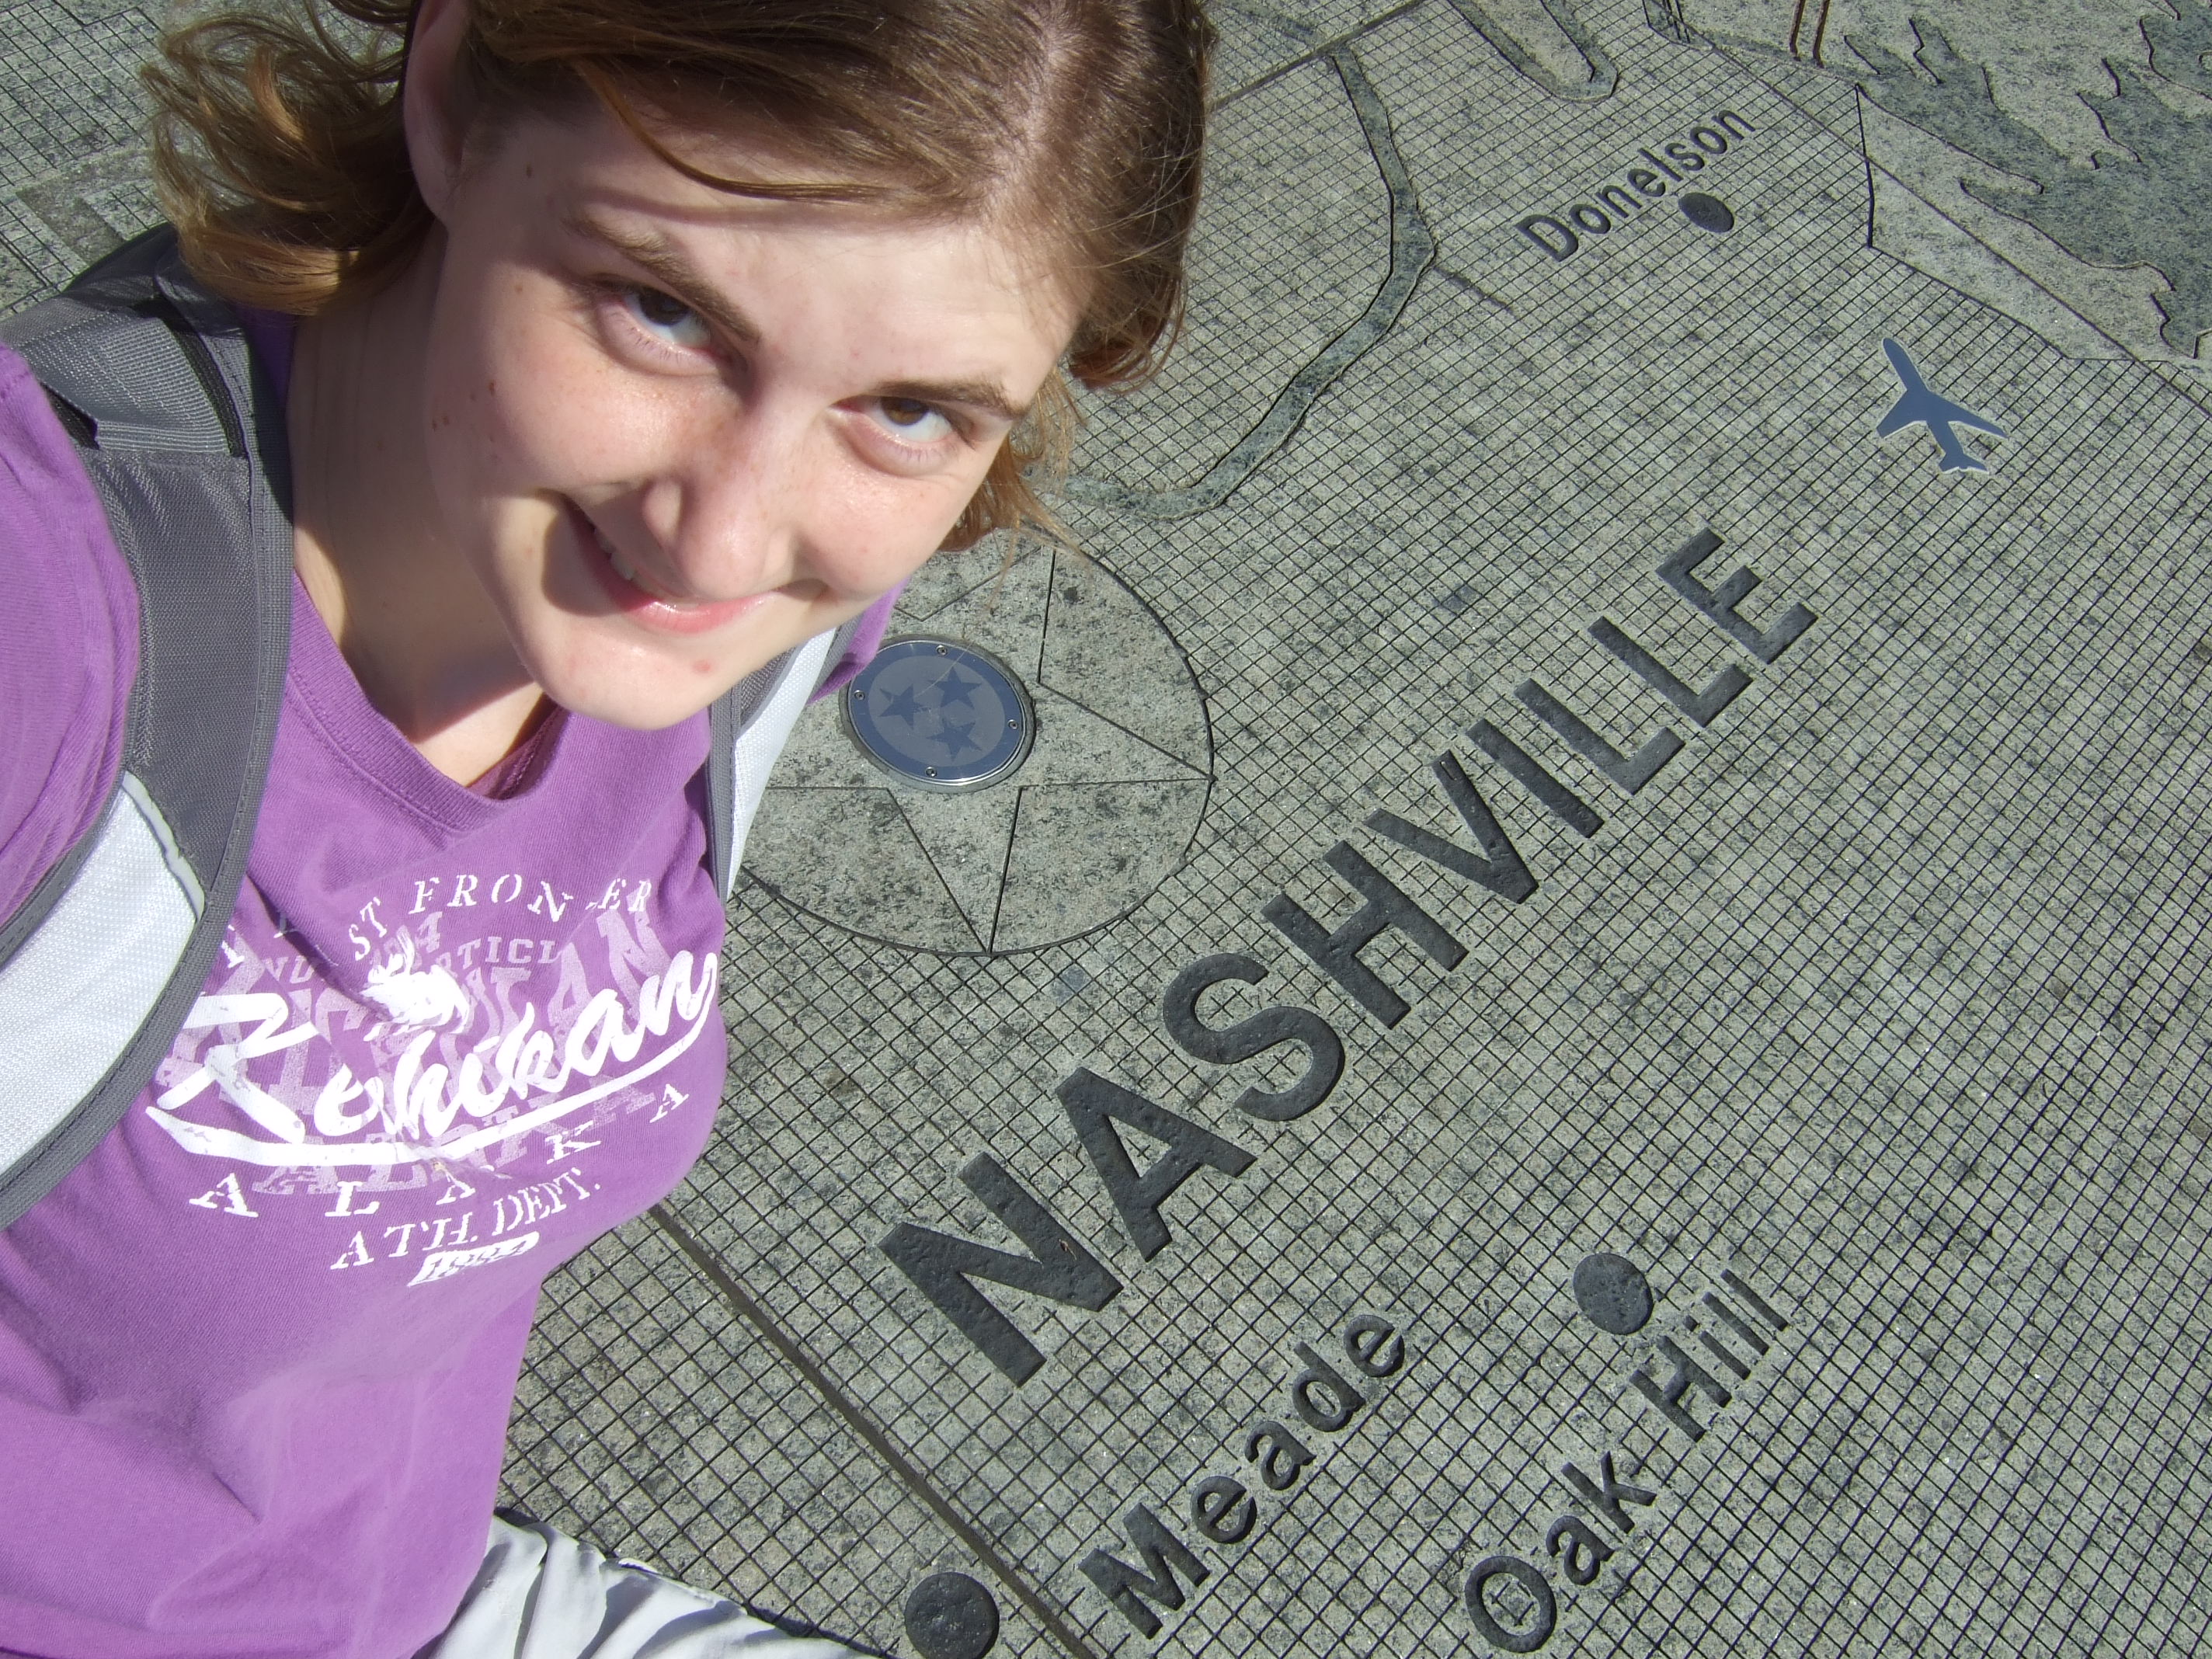
Tennessee- I took a trip to Nashville (and a couple surrounding towns) and Martin. This was the first place I ever stayed in a hostel, and now, I can hardly remember how I traveled without hostels!

Texas- I stopped in Amarillo overnight. I bought spray paint, ate Texas BBQ, and the next morning, I legally vandalized Cadillac Ranch. I was surprised to learn that spray paint doesn’t work too well in below-freezing temperatures. Yes, in Texas, which I always pictured as a giant hot desert, there was snow on the ground and temps in the twenties!

Utah- What a salty place! I could tell when I crossed the border between Nevada and Utah because the landscape went from brown mountains to white salt flats. I camped on the Salt Lake and floated with the brine shrimp. The next day, I went into the city and saw Temple Square.

Vermont- I haven’t seen it.

Virginia- My 10th grade class spent some time in Alexandria. It was mostly because it was cheaper to stay here than in DC, but we did some tourist things in Virginia as well, including a downtown ghost tour, Arlington, and Mount Vernon.

Washington- I visited the Oregon border town of Vancouver (not Canada) when I had relatives living there. Later, this was the scene for the first out-of-state trip I took without family, when I was twelve and went on my first choir tour. One of our tour stops was Seattle, which is still a city dear to my heart.

West Virginia- I’ve been to every state surrounding West Virginia, but not West Virginia itself.

Wisconsin- I went to two different camp conferences in two consecutive years, both in early March. One was in Lake Geneva, and I had to borrow shorts because it was so warm. The other was in the North Woods, which was so freezing and deep in snow that I walked on the solid lake!

Wyoming- I’ve been to Yellowstone, and this was also a state I visited twice while moving cross-country (one move in either direction).

As a bonus, I’ve also been to Washington, DC. As mentioned in conjunction with other states, this was part of my 10th grade East Coast school trip. Ever since then, I wanted to go back and spend more time on my own with the things that would interest me.

There you have it. I’d like to start working on getting to the other seventeen states on this list, because it would be really nifty if I could get to fifty!

destinations, moving, Recap, road trip, Things to Do, travel tips

Choose Your Own Blogventure

It’s been awhile since I last posted a personal blog update… Nearly a year! Yet despite a global pandemic, that didn’t crush my adventurous spirit. It just changed some things about my life… a lot!

I wanted to update everyone who lands here on what I’ve gotten to do over the past year. At the end, YOU will get to decide which of my adventures I’ll blog about next!

KCMO

About one year and one week ago, I moved to the Kansas City area after a short stint in Colorado Springs. I ended up spending four months working at a camp on the Missouri side, using my days off to explore downtown KC and take day trips to the Ozarks, Silver Dollar City, and Marceline (the boyhood home of Walt Disney).

South Road Trip

Exactly one year ago, I was planning a work-sponsored trip that was completely unrelated to work, other than the fact that I would be road tripping with two of my coworkers. But since we were going on our workplace’s dime, we drove down to Joplin to see a waterfall, and then saw some real waterfalls crossing into Arkansas. From there, we saw the original Walmart, camped at Beaver Lake, drove by the Duggar’s big house (and they drove by us in their van!), visited Cathedral of the Ozarks, then drove into Oklahoma where we stayed at an amusement-park-turned-summer-camp and visited The Gathering Place in Tulsa.

More Road Trips

I left Kansas City due to a job offer in San Diego. I split that move into two road trips: First a Christmas road trip along Route 66, into Texas and New Mexico for the first time, where I spray painted in freezing weather at Cadillac Ranch, saw the Grand Canyon, and experienced all that Vegas had to offer even in a pandemic. I spent a few weeks for Christmas with my parents in Oregon, then drove down the coast to the great San Diego area.

Surrounding San Diego

Since then, I’ve been exploring America’s finest city… and beyond. Besides hiking trips outside the urban area and day trips to places like the Padres game, Old Town, Seaworld, and the beaches, I’ve gone further with an overnight trip to California Adventure, hiking in San Clemente, camping in the desert, and even solo tripping to Mexico a few times!

The Why and How Behind this Travel

Although I’ve been working at the same place since January, my job has changed since then. I’m working at a conference center and am now long-term instead of my original temporary plans. As program manager, summer camps were extra hectic, and now I’m looking forward to a season of administering the outdoor science school, among other responsibilities.

Now that you’ve read all this, what do you want to hear more about? Do you want to learn how a single woman can feel safe crossing the southern border alone? Or how Disney’s home in Missouri relates to his legacy resort in California? You could be wondering why a non-fangirl visits so many celebrity homes. Maybe you need a bucket list for a city you’re visiting… would that be for Colorado Springs, Kansas City, or San Diego?

What will my next post be? Tell me in the comments!

culture, destinations, England, road trip, travel tips

The Stonehenge of America

As a US American citizen, it’s not always easy to hop across the pond for European adventures. So when I can find a European experience in my own country, I’m all for it!

There are a lot of Stonehenge knockoffs in the United States. I regret not having a car while living in Nebraska, because it could have taken me to see Carhenge. There’s also a Foamhenge in Virginia and Alabama has its own fiberglass “Bamahenge”. But nearest me is the Stonehenge of Maryhill, Washington. It’s just across the Oregon border, making it easily accessible by both states. After I visited Multnomah Falls, I headed further east for this next stop.

Since I got to visit the real Stonehenge while in England this past May, it was fun to compare the original stones with this full-scale replication.

History

Stonehenge

Me with the Heel Stone at England’s Stonehenge


England: Part of the enticement to Stonehenge is that no one knows for sure how it was made or what it was used for, though we do estimate it at being 5000 years old. Many theories for its purpose have been presented over the years, but currently, there is strong evidence suggesting it was a sort of calendar device, due to its specific alignment with the solstices.

maryhill stonehenge

The Heel Stone at Maryhill’s Stonehenge


Washington: One hundred years ago, England’s Stonehenge was believed to be used for human sacrifice. So when the founder of Maryhill’s Stonehenge wanted to build a memorial to the recently-deceased of World War I, he thought about the sacrifice these soldiers gave and thought Stonehenge would be fitting.

Material

Stonehenge Visitor Center

A replica of what may have been used to transport the heavy stones of Stonehenge


England: Perhaps Stonehenge’s biggest mystery is how the builders obtained the stone from 200 miles away, without any modern machinery. Erecting this circle would have been difficult as well.

Maryhill Stonehenge

If it’s made of concrete, should it be called Concretehenge?


Washington: Originally, the plan was for this memorial to be made of local stone. But building a Stonehenge out of stones proved to be difficult even in more modern times, so they switched to concrete. The concrete doesn’t look nearly as beautiful as the original stones, but they tried to improve the appearance by using foil to create a crumpled texture.

Appearance

Stonehenge

England’s Stonehenge with a visible attempt to keep the ruins intact


England: Stonehenge is in ruins; there’s no doubt about that. I visited midday, so I was able to walk around the path, admiring the stones from a bit of a distance. There are special sunrise and sunset tours that allow visitors to walk into the inner circle, but they still cannot touch the stones. Many pieces have fallen and some are missing.

Maryhill Stonehenge

Can you picture the original Stonehenge looking like this one in Washington?


Washington: My favorite part about this Stonehenge is that it was an opportunity to see what Stonehenge was intended to look like. At a mere century old, the preserved memorial shows the Stonehenge with all of its transepts intact. Best of all, you can get up close and personal with this Stonehenge. Spend as much time as you want walking through the inner circle, and even touch the “stones” if you want. No special tour necessary.

Location

Stonehenge

England’s Stonehenge as seen from the road


England: Stonehenge is situated on the Salisbury Plains. Although its mostly surrounded by farmland (sheep get to spend more time viewing Stonehenge than humans do), it is visible from the throughway. To walk around Stonehenge, though, you’ll need a ticket before taking the bus ride from the parking lot to the stone circle. Since I’m not comfortable driving in England (or really any foreign country), I took one of the many bus tours that stop at Stonehenge.

Washington's Stonehenge as seen from the road

Washington’s Stonehenge as seen from the road


Washington: Fortunately, I am comfortable driving in most of the United States, which is good because I’m unaware of any busses that stop here! Parking was free and right next to Stonehenge. This Stonehenge is also conveniently located off a highway, though you have to drive a mile or so down country roads before it becomes visible. It sits atop a hill, with a gorgeous view down to the Columbia River and the surrounding farmland. Instead of sheep, these farms are for orchards and wind power!

Other Attractions

Stonehenge Visitor Center

A prehistoric re-creation at the Stonehenge visitor center in England


England: The visitor experience at Stonehenge has really improved with the addition of a visitor center. This museum has videos, artifacts, and replicas of past life in the area. There are also bathrooms, a gift shop, and a cafe. I took the advice of some other travelers who said I shouldn’t take such a long bus ride from London just to visit Stonehenge. So I found a bus trip that also included an extended stop in Bath.

War Memorial

War Memorial next to Washington’s Stonehenge


Washington: There was a little building at the site entrance, but it wasn’t open at the time so I don’t know what lies inside. There was a flyer that listed some interesting events, and there were port-a-potties on the side of the building. Although there weren’t restaurants, there was a picnic table where I enjoyed a snack I brought. There’s also a soldier memorial to remember the wars that have happened since this Stonehenge was erected to commemorate WWI. I also don’t think you should make this trip just to see this Stonehenge. Across the river bridge is The Dalles, Oregon, which leads into the high desert. I also included Multnomah Falls, Crater Lake National Park, and a few state parks on this weekend trip.

One other big difference between the two Stonehenges was the crowds. One had hundreds of visitors while I was there, while the other only had a couple visitors at a time and I even got to spend some time all alone there. I bet you can figure out which was which!

Have you ever visited a replica of a landmark from another country? Tell me about it in the comments; I’ll probably want to see it too!

The Stonehenge of America

Whether you’re in the US, Europe, or anywhere else in the world, you can turn little attractions like this into real adventures! Learn how in my brand-new book, Uncommon Adventures, available in paperback and Kindle ebook

Uncommon Adventures Jessica Lippe
Want to take more trips to places like this? Be sure to check out my new book, Uncommon Adventures, now available on Amazon!

destinations, road trip, travel tips

All You Need to Know About Multnomah Falls

Although I’ve lived in various places across the United States, most of my life has been spent in Oregon. So it might be surprising that I had never been to one of Oregon’s most popular attractions, Multnomah Falls.

Travel tips for Oregon's Gorge.png

Multnomah Falls is a tall waterfall in The Gorge of Northern Oregon, just off of the I-84. One of the reasons I hadn’t been to Multnomah Falls was because I had only been on I-84 twice. Both times I was merely a passenger on a bus so I didn’t have control over where we stopped, though on my second trip I at least got to see the upper part of Multnomah Falls from the highway.

But this summer, I wasn’t able to get out much. My last overnight camping trip was in June, and I ended up sick the entire time. Other than that, I went on a few short day trips and housesat a little, but for the most part, I was choosing to put in extra hours at work so I would have more money to spend on travel later. Of course, part of that work involved releasing my new book, Uncommon Adventures! Anyway, when I had a rare free summer weekend, I knew I needed to pack in as much adventure I could, and that would mean a visit to a place I’d never been before!

I learned a lot on my visit to Multnomah Falls, and now you can get a look at the inside scoop!

i84 Oregon Gorge
The view of Multnomah Falls from the highway parking lot

Parking is Limited

As a top Oregonian attraction, the parking lot just can’t be big enough in the tourist season. Several websites said that there is typically no parking between 11 and 4 on most summer weekends, and some visitors recommended getting there by 9:30.

My original plan was to leave on Friday and find an inexpensive Airbnb to stay in somewhere south of Portland. Then I could easily arrive at Multnomah Falls on Saturday morning. But when I didn’t find anywhere I wanted to stay, I decided to save some money and stay in my own home that night. However, Medford is nearly five hours away from Multnomah Falls, so by 4:15am, I was cruising up the freeway! So worth it, though. I arrived at the big parking lot that’s centered in the middle of Highway 84, and got the first spot in the lot.

After hiking to Benson State Recreation Area (more on that later), I saw their parking lot jam-packed, mostly from visitors who were walking to Multnomah Falls from there. And it was a $5 fee to park there! If you can’t park at Multnomah Falls, there are lots of nearby state park sites that you can go to instead, but most of them have a day-use fee. I returned to the free Multnomah Falls parking lot at 1pm to grab my packed lunch, and every space was taken. Signs were posted that both parking lots were full. When I left for the day at 4pm, the parking lot was open again, but still mostly full. My parking space was taken literally as soon as I pulled out!

Multnomah Falls Bridge View

There are Three Falls Viewpoints

Most people visit Multnomah Falls from the viewpoint at the base. If you look up a picture of Multnomah Falls on the internet, it’s almost guaranteed that the top results are all taken from this viewpoint. But in those pictures, you’ll see the bridge that separates the upper fall from the lower. Getting to the bridge is just an easy, uphill, paved walk, and many people head up there to see the falls up-close. If you’re up for a bit of a longer and more strenuous hike, you can visit the top of the falls. It’s a steep mile with lots of switchbacks, so not as many people were up at this viewpoint.

Unless this is just a quick roadside stop (which it shouldn’t be if you can avoid it) or your physical ability doesn’t allow it, make an effort to get to the top of Multnomah Falls. Not everyone has the opportunity to hike up Oregon’s tallest waterfall. I saw lots of retirees and families on this hike, some even carrying toddlers on their backs. So while it is exhausting, it is doable for most people. Once you reach the top, you can relax there for awhile. Take some pictures on the viewing platform, or admire how calm the Multnomah Creek is before it turns into a roaring waterfall. Then you can either head back down the way you came, or continue further on the less-explored part of the trail.

Waterfall
This is smaller and more uphill than Multnomah Falls, but there are also smaller crowds

Multnomah Falls Isn’t the Only Waterfall

There are three other waterfalls in this park. You first have to hike to the top of Multnomah Falls, but if you choose to continue up the trail, you’re in for some real treats.

There are three waterfalls upstream that are all relatively close to each other. This is part of an extensive trail system. If you decide to hike beyond the waterfalls, there are lots of mountain trails you can go on. I chose the five-mile loop to Benson State Recreation Area. I didn’t have to worry about getting lost because whenever I came to a fork it the road, there was a signpost saying which trail was which. I also got a free map from the Visitor Center before I headed out, which was where I found out that this large loop trail even existed.

But as the visitor center volunteer told me, I didn’t have to hike the entire loop. I could have hiked to the waterfalls and then turned around. I decided to take it one step at a time. At first, my goal was just to get to the top of Multnomah Falls. Then I decided to check out the other waterfalls. It was there that I decided I might as well go all the way. I was rewarded. The forest was beautiful, and I spotted more waterfalls as I entered Benson State Recreation Area. While this state park has a $5 entry fee if you come by car, entering on foot is free!

Multnomah Falls Cookie

The Cookies are HUGE!

I packed a lunch and plenty of other food for the road trip, but you can also eat at Multnomah Falls. There’s a sit-down restaurant and a few snack bars. Snow cones and soft-serve ice cream were two popular choices, but I decided on a cookie for a waterside snack. They were four dollars (which was less than most other snack options), but they were humongous, so it turned out to be a great deal. You could even split this dessert with all your road trip companions. I did this trip solo, though, so I was in for a delicious sugar rush!

Memaloose State Park
Memaloose, one of the Oregon State Parks in The Gorge, is beautiful

You Can’t Stay the Night

Overnight parking isn’t allowed. Despite its name, the Multnomah Falls Lodge has a visitor center, gift shop, restaurant, and bathrooms, but no sleeping quarters. Thankfully, there are lots of nearby state parks where you can stay affordably.

I ended up staying the night at Memaloose State Park. Like many of the other local state parks, it’s situated on the Columbia River with an overlooking view of Washington State. It is a bit further than other campgrounds like Ainsworth, Government Island, or Viento, but I was heading east for the next stop on my trip, so it served as a good midway point. If you can’t find an available campsite from Oregon State Parks, check if there is any availability at the nearby Washington parks.

Multnomah Falls

Overall, It’s a Great Experience

I loved my trip to Multnomah Falls, and I’ll stop there again whenever I pass through the area from now on. Some people stay for less than an hour, while others stay all day. I enjoyed the natural setting for about seven hours, though I could have easily made this stop longer or shorter. But I had been up since the middle of the night, and I still had a bit more driving to do before I reached Memaloose State Park. Besides I wanted to be rested up for the next leg of this road trip? Any guesses where it is? I’ll reveal my next stop later this week, or you can find out the answer by following me on Instagram.

Have you visited any waterfalls before? Which has been your favorite?

Uncommon Adventures Jessica Lippe
Want to take more trips to places like this? Be sure to check out my new book, Uncommon Adventures, now available on Amazon!

culture, destinations, England, Things to Do

My Three Parthenon Trips

A trip to the Parthenon…what does this make you think of? For most, that would involve heading to Athens, Greece. That was one of my Parthenon trips. But my first Parthenon trip happened three years before I ever even set foot in Europe. And my last Parthenon trip happened over three years after I left Greece. What an uncommon adventure! To understand the full significance and beauty of this historic architecture, I believe it requires three trips to three different countries.

Nashville: Discovering the Former Glory

2012-09-29 08.55.24

While not a primary reason to visit Tennessee, I loved visiting the world’s only fully intact Parthenon and saw it almost every day while in Nashville. While it doesn’t have millennia-old history or fine material craftsmanship, this is one of the best places to go to visually learn about the Parthenon.

The exterior is a spitting image of the Parthenon in its glory days. You can walk around and see each piece of art. You can even walk up and touch the columns or sit on the steps, something you absolutely cannot do at the Acropolis. Another thing you can only do here is step inside the Parthenon. While the lower levels definitely look modern-day, the top level features a giant statue of the Greek god Athena, the namesake for Greece’s capital. While a similar statue used to be housed inside Greece’s Parthenon, no one knows what happened to that behemoth. So not only is this the only place where you can see the Parthenon in its intended glory, but also the only place to see this statue and what it looked like inside.

At the time of my visit to Nashville, I had never been to Europe. I wasn’t sure if I would ever get to Greece in my lifetime, but I recorded in my travel journal that if I did make it there, I might be disappointed at the real Parthenon.

Athens: The Real Deal on Location

IMG_20150926_135714_859

A few years later, I found myself in Greece! And I recorded in that travel journal that I wasn’t sure if I liked the Greek or American Parthenon better.

The center of Athens is the Acropolis, and the centerpiece of the Acropolis is the Parthenon. This is the original. It’s a special experience to be able to walk among the ancient buildings atop this mountain. The ruins are preserved as best as possible there, but the art is better kept in a different home. Just downhill, the Acropolis Museum recreates the Parthenon indoors with the friezes displayed in their original order. Other Acropolis archaeological finds are on display here as well. But not everything from the Parthenon is housed in this museum.

The Parthenon is in ruins, partially because of its age, and largely because of an explosion when it was being used to store British military ammunition. If you speak to a local Greek about the Parthenon, they will be sure to include blaming the Brits. Not only for the explosion, but also because they “stole the original art off the Parthenon and refuse to give it back”. The Greeks’ relationship with the British might be strained because of this, but for me, this international argument was mostly just a call for me to take another trip.

London: Rounding Out with the Lost Art

DSCF6391

After seeing the Parthenon in Athens, my next trip to Europe had to involve Great Britain. While an expensive city, London can be done on a budget, especially when you visit the free museums! One of the best museums (that also happens to be free) is the British Museum, oddly named since it consists entirely of artifacts taken from other countries. An entire section of the museum is devoted to ancient art from Athens.

Stepping into the Greek section of The British Museum almost felt like being teleported back into Greece. The room appeared to be the Acropolis turned outside-in. Each end of this room displays the Elgin Marbles, the statues that originally adorned the Parthenon. They are displayed in the same order as they were intended to be, so you can easily imagine the Parthenon’s roof topping just over their heads. Other statues are bookended by this art, along with a message of the United Kingdom’s stance on why they believe the Parthenon pieces in their collection should remain under their care.

The British Museum had a lot of other fascinating artifacts, such as the Rosetta Stone. London itself had even more to offer. But the feeling of being among the Parthenon’s marble statues was uniquely satisfying. After many years and a worldwide search, I had finally come full-circle with seeing every element of the Parthenon that began with an unlikely trip to Nashville.


The Parthenon Around the World.png

Get travel inspiration for around the world with the Parthenon and more when you order my new book, Uncommon Adventures!

Which Parthenon trip would you most like to go on? Let me know in the comments!

resources, road trip, saving money, travel tips

How to Save Money on a Passport

Can you believe there was an upcoming road trip that I DIDN’T want to go on? I really didn’t want to go to Seattle. It’s not that I don’t like Seattle. In fact, that’s the city where I first really fell in love with travel. But I wasn’t looking forward to the reason that I might have to go there.

The government was forcing me.

Seattle Pike's Place Market Pig Art
At Seattle’s famous Pike’s Place Market when I was sixteen. This was a trip taken out of necessity, not pleasure. But it did end up letting me save money on a passport!

This is my personal experience in getting two passports in twelve years. Read to the end for tips on how to save money when getting YOUR passport!

Seeing Seattle

21032_103612196332509_2304179_n.jpg
The Seattle Space Needle. Money tip: It’s super expensive to ride the elevator to the top, but totally free to walk around the artsy perimeter!

You see, when I was fifteen, I applied for my very first passport. I was headed to Peru with my youth group. Unfortunately, this was 2007, when it first became a requirement that US citizens have a passport to go to Mexico and Canada. That really increased the demand for passports, and mine somehow got misplaced or pushed to the back burner in the passport-producing office. No matter how many times I called to check on it or how many times it got expedited, it was just not coming on time. And I applied months in advance! My mom had to drive me to an appointment in Seattle to get a same-day passport just a few days before I left. My original passport ended up arriving the day before I RETURNED from Peru! So I ended up having two US passports for a short period of time, but since that’s illegal I had to send the unused one back. (I also ended up with two birth certificates due to this fiasco, but apparently, that’s allowed.)

On that trip up to Seattle, I was excited. I had been a couple times before on choir trips. I think I fell in love because it was my first time being out of state for multiple days without any relatives. Who knew this independence would cultivate a solo female traveler? Even though I was going with a family member now, I was excited to see things on my own terms this time. My mom had never been to Seattle, but she wasn’t nearly as excited. She warned me that she would turn the car around if we heard word that my passport was being shipped. She wanted to leave Seattle pretty much as soon as I had a passport in hand. However, it did take several hours between our appointment and the time that the passport got printed, so I did have time to show her the main sights. While I did understand that this excursion was unplanned for and an inconvenience, I didn’t get why we couldn’t think of it as a fun bonus trip. Now that I’ve had experience as an adult getting my second passport (well, technically it’s my third if you count the one I had to return), I’m definitely more understanding.

I Almost Repeated this Seattle Incident

Eiffel Tower Paris France Europe
Paris was the first stop of my first trip to Europe. But will I be able to complete my second trip to Europe next week if I don’t have a passport?

For my upcoming trip to Ireland and England, I made plans. I bought tickets. I made reservations. I saved money. I kept you all updated in my progress for getting there. I even booked another international trip for later this year. I was excited to go, and nothing could stop me. Except for maybe the fact that I didn’t have a valid passport.

My first passport expired in 2017. I originally planned to renew it six months before its expiration so that I would always be ready to jump at any opportunity to visit another country. I even got my passport photos taken and filled out an application. But then I decided not to send it in. I didn’t have any travel plans in the works. I figured that I would wait until I actually needed a passport again. Since an adult US passport is valid for 10 years, I could extend the validity by waiting. Unfortunately, I waited a bit too long.

I applied for my passport seven weeks before my departure date. The government asks for 4-6 weeks for processing, and lately, I’ve heard most people getting their passports in less than four weeks. So I figured I was good to go.

Four weeks passed. No passport. I started checking online. All it said was that it was “being processed”. Finally, I had to do it. I made an appointment at Seattle’s passport agency.

There’s actually a closer passport agency in San Francisco. I couldn’t go there in 2007 because it was all booked up for weeks. (It probably wasn’t as bad as the agency I saw when I went to New York City in June 2007. The line of people waiting to get passports there wrapped around the block! If I’d known that my passport wouldn’t be coming, I would have stood in line with them.) I considered going there this time, but I’ve driven in San Francisco traffic before. It might be faster to drive to Seattle. I also wanted to take a quick trip to Portland, so I could just tack on a detour to Seattle after that.

Thankfully, the day after I made my appointment to go to Seattle one week before I leave the country, I got an update that my passport was being shipped. This not only saved me time and stress, but also saved me the extra day I would have to take off of work to get to Seattle, the costs associated with driving up there, the night in a hostel, and parking fees, not to mention the expedited fees.

Did I Save Money?

Inca Kola Peru
My first time using my passport was a mission trip to Peru, where I fell in love with their Inca Kola.

So yes, I guess I saved money by planning ahead (although I barely squeaked by with only a one-week buffer). I won’t have to cover the costs of a mandatory bonus trip. But even when I did have to take this bonus trip for my first passport, my family was surprised that we still ended up saving some money.

At the recommendations of friends, my mom and I stayed in SeaTac, the Washington city between Seattle and Tacoma that houses the airport. A motel there was cheaper than downtown Seattle. On the way there, we did have to stop in Salem, Oregon so I could get a new birth certificate. (My original birth certificate was wherever my original passport was.) That cost money, but even today it’s nice to know that I have a backup birth certificate in case something happens.

We knew there was an additional expedited fee, and my mom assumed that we’d also have to pay the passport fee. When we got to our appointment, we found out we didn’t have to pay the passport fee again (we already paid it when we applied for the original passport). But it was a nice surprise to find out that we didn’t have to pay the expedited fee either. It wasn’t our fault that my passport was left untouched for months, so the government was nice enough to cover their mistake. Since the agency is in a metropolitan area, we did have to pay for parking. But while we waited for the passport to print, we were able to sightsee on foot for free. We went to the sports stadiums, the Space Needle, and so much more!

Renewing a passport is a little less expensive than applying for a first-time passport IF you send in your previous passport. I kept my old passport in my dedicated travel supply drawer, so I sent that in with the lower fee. The renewal application is something you just have to print and mail, which saved time. I paid extra for tracking with the postal service, but overall spent less than my first-time passport.

Or did I?

Here’s the super-special way I saved on my first passport that I like to brag about, since I don’t think it could ever be replicated.

How old was I when I applied for my passport? Fifteen. For children who apply for passports at age fifteen and younger, the passport is only valid for five years. It costs less than an adult passport. If you apply after your sixteenth birthday, you have to pay for a full-fledged adult passport, but that is valid for ten years.

By the time I was headed to Seattle to get my same-day passport, I had already turned sixteen. That meant they had to give me the ten-year adult passport. But the agency considered the payment that was sent with my original passport application as payment in full. That meant I got a ten-year passport for the price of a five-year passport. When I did receive the original passport, it was indeed only valid for five years. Actually, it was never really valid at all since the government demanded that we send it back. But I definitely enjoyed those extra five years on my first passport. For the first five years on that passport, I took two trips to Peru and a trip to Mexico. With my five free years, I walked to Canada a couple times. (Yes, I walked to Canada. Okay, I was staying less than a mile from the border in Niagara Falls, so it wasn’t that big of a feat.) It was also during those five free years that I spent three months backpacking across the Mediterranean. That’s a well-used discount passport!

How to Save Money on Your Passport

US Passport
Headed home from Seattle with my very first passport. Glad I don’t have to go through that this time around!

Note that these are based on my experience in the US. Your results may vary.

  • If you have an expired passport, keep it in a safe place so you can use it to save time and money on your next passport application.
  • If you don’t have travel plans, consider waiting to apply for a passport. (But don’t wait too long!)
  • Don’t get your passport photos taken only to not apply for a passport. It’s illegal to send in photos that are older than six months, so these pricey pictures are pretty much worthless after that.
  • Don’t pay to expedite your passport. Apply for it more than six weeks before your departure date. If it doesn’t look like it will come in time with this precaution, call to have the government expedite it for free due to their delay.
  • Spring on the few extra dollars to get tracking when mailing in your passport application. Once it’s arrived at the processing center, you can track it for free at passportstatus.state.gov.
  • If you do end up having to visit a passport agency, make the most of your trip. Check to see which agency is closest to your home, but also consider further agencies if it will save you money or make your trip more fun. Depending on the circumstances, you may have to pay the expedited fee at the agency, but if it’s due to a processing error, you should be able to get your passport at no extra cost. Make sure you have all the needed documents (and maybe some extras, just in case), so you don’t take this trip for nothing. There are only a handful of passport agencies scattered across the United States, so it will be an ordeal of a trip for most of us!

Did you think it was possible to save money on a passport before you read this? Did anyone besides me end up with a discount passport? Share your thoughts in the comments!


How to $ave on your Passport
Pin This!

It’s tricky to get a passport discount, but you can easily save money on travel and more by heading over to Swagbucks!

Accommodations, destinations, resources, road trip, saving money, travel tips

The Best Hostels from My Oregon Road Trip

I hadn’t realized that I’d only seen a small part of my home state. After years of numerous road trips, I still missed so much that Oregon has to offer. This past November, I took a road trip to explore a town I’d never heard of as well as revisit a city I’d only ever had a glimpse of. To maximize my time and money, I stayed in centrally-located hostels. Road tripping to hostels isn’t always easy, especially when it comes to finding parking. But so far, all of the Oregon hostels I’ve stayed at have provided plentiful parking in a good area, as well as so many other unique amenities. Both hostels from this trip were great; I think you should stay there too!

Bonus: Be sure to click on the links to see my full reviews at Hostelz.com!

Mitchell, Oregon

Painted Hills Mitchell Oregon

To be honest, I didn’t even know this tiny town existed before I starting researching for my road trip. But I had heard of the Painted Hills, one of the 7 Wonders of Oregon. A short drive and several quick hikes took me through a sightseeing tour of awe-inspiring multicolored formations. Mitchell, Oregon is the nearest town to this national monument. While the Painted Hills are the most notable landmark, the entire drive from Central Oregon to Mitchell offered scenic views.


This slideshow requires JavaScript.

Just eight miles away from the Painted Hills National Monument is Spoke’n Hostel, located right next to the city limits. Although I didn’t spend much time in the town proper, my fabulous night in Mitchell suggested that Spoke’n Hostel is the place to be in Eastern Oregon!

I was greeted by the owners, who have renovated their church to welcome TransAmerica cyclists and Painted Hills travelers in the most beautiful way possible. The sanctuary-turned-bunk room is the best I’ve ever seen. The big locally-made beds with privacy curtains offer a comfortable rest and personal necessities (like lamps and charging ports). Surprisingly, I was the only guest that night, so I was upgraded to a cozy private room. Down in the basement, I used the library, kitchen, games, and other fun activities. Even the backyard is picturesque!

Bend, Oregon

1113180917.jpg

In the heart of Oregon, you’ll find Bend, a city thriving with its city fun and outdoor adventure. I spent nearly two full days exploring just a sample of what Bend had to offer. I went for long walks, including my own alcohol-free version of the Bend Ale Trail. I followed the Deschutes River, ate delicious food, and saw unique sites like the High Desert Museum and America’s only remaining Blockbuster Video.


This slideshow requires JavaScript.

Bend has history, too! And what better way to be a part of its history than staying in the city’s very first brick building? Bunk + Brew Historic Lucas House was an old building with a young heart. Just a block away from downtown, Bend’s only hostel offered a variety of dorm rooms (I stayed in the four-bed female-only dorm), make-your-own-breakfast, and adventurous employees who can make your time in Bend even more enjoyable.

Other Oregon Hostels

La Pine State Park Oregon

For the third night of my trip, I couldn’t find a hostel on the route between Bend and my home in Medford, Oregon. Instead, I stayed budget-conscious while getting a room of my own by renting a cabin and staying at La Pine State Park. While I enjoyed the miles of hiking trails and seeing the world’s largest ponderosa pine, I did miss the typical hostel amenities, such as breakfast, walkability, and getting to meet other travelers from around the world. (I think there were only two other campers on that below-freezing night!)


This slideshow requires JavaScript.

However, the next week, I was on a shorter road trip on Oregon’s I-5 when I discovered that Wolf Creek Inn offers hostel rooms as part of their historic hotel. Here are a few other Oregon hostels I’ve stayed in:

I loved staying in the Eugene Whiteaker Hostel.

Ashland Commons is another good hostel choice.

Question: Which hostel would you most like to stay at? Do you have a favorite road trip route? Let me know in the comments!

Accommodations, camp, holiday, resources, road trip, saving money, seasonal, travel tips, Winter

How I Paid Next-to-Nothing for a Hotel Room

I rarely ever stay at hotels. There are so many other accommodation options that typically provide a better value in terms of service, activities, and price. But I recently decided to book a short end-of-year weekend trip to the Oregon Coast. I usually camp when I’m on the coast, but since I don’t have a heated RV, that isn’t a practical option in the winter. I did check out the state parks to see if they had any heated yurts available. I only found one campground that had one yurt available for one night. I reserved that for a grand total of $51, but that still left me with another night of no accommodation. That’s when I turned to look at hotels.

I ended up finding a hotel room in an ideal location that included breakfast and a few other amenities I would enjoy. Although the room was listed for $70, I used some creative techniques to get the price even lower than the cost of my night in the yurt. And then I did a little bit more to get it for practically FREE!

I will be doing the same process to save money on hotels in the future, and you can too! You can use either tip separately, or combine both for maximum savings!

2 Simple Tricks

This post utilizes affiliate links

Tip 1: Hotels.com Hacks

I decided to book on Hotels.com so I could easily compare the prices of different hotels. It turned out that Hotels.com offers even more savings than just price comparisons! I found a hotel that normally started at $70 but was discounted to $65.

That was okay, but I wanted it for less, especially after taxes and fees were added to that price. I found a Hotels.com promo code that saved me 10%. With that included, my grand total was down to $63.06. Not bad, although I wanted to do better. I booked it anyway.

After paying, I read up on Hotels.com’s price guarantee. Basically, it said if I could find the same type of room at the same hotel for the same dates for a lower price anywhere online, they would match that.

It only took me one Google search to find several booking sites that offered rooms at this hotel for $51. But upon closer inspection, these were for rooms with a queen bed. I had booked a king bed, since on Hotels.com they were both the same price. But on these sites, the king room was still at $65. No savings there.

Then I decided to visit the website for the hotel itself. Oftentimes, booking directly will be a little cheaper since the hotel doesn’t have to pay commission fees. Sure enough, I found a room with a king bed for $51 on their website. I took a screenshot and filled out a quick form on Hotels.com. Pretty soon, I received a refund of $14.58.

That meant I got what might have been a $70 room (not including taxes and fees) for a grand total of $48.48 (including taxes and fees). All I had to do was use a promo code and a price match. I’ve stayed in some hostel dorms for more than that! It was even $2.52 less than my campground yurt!

(Note: Hotels.com has a rewards program where if you buy 10 nights, you get one night free. However, my promo code excluded me from collecting rewards points. But since getting 10% off a night now is better than possibly getting a free night sometime in the future after 10 other nights, I didn’t mind. If you’re trying to decide whether to use a promo code or the rewards program, check out tip #2 for one more thing that may help you decide!)

If that sounds like a good deal to you, feel free to stop reading here. If you’d like to save even more, check out the next tip!

Tip 2: Swagbucks Savings

Swagbucks is essentially savings central. You can earn points called SB by doing things like searching the web, online shopping, and taking surveys. I’ve even earned quite a bit here by donating to charity! After earning SB, you can trade them in for real cash. You can cash out to PayPal or a Visa card, or buy one of hundreds of gift cards. These gift cards can even buy your way to free travel. 

If you don’t have a Swagbucks account yet, click here to sign up with a 300 SB bonus!

Join Swagbucks!

I earned enough just from my regular Christmas shopping to get a Hotels.com gift card. Adding the Swagbucks app to my browser has notified me of lots of cashback opportunities I didn’t even know existed. If you don’t want to spend any money at all, you can still earn with Swagbucks. I’ve earned gift cards by taking surveys, using the Swagbucks search engine, and checking out free offers- no purchases are needed to get a gift card!

Hotels.com is one of the online stores where you can earn cash back on Swagbucks. Although the offer varies from time to time, you will always earn more SB if you book a hotel room without earning Hotels.com Rewards. So if you book a room on Hotels.com with a gift card that you earned on Swagbucks, and you get SB for your stay, you’re basically getting paid to stay in your hotel room!

Since I used a promo code I was not eligible to earn SB on this particular trip, but I ended up saving more with the promo code than what I would have earned in SB. However, when I make a reservation in the future, I will check to see if Swagbucks has a better current payout than the available promo codes!

(Note: On this road trip, I’ll also be paying for gas with gift cards earned through Swagbucks. Check out this post for more details.)

Now I have a great trip at a great price to end 2018. One of my 2019 goals is to pay for a trip with creative couponing (such as using Cardpool as well as Swagbucks and tricks like these for Hotels.com) so you can expect to hear more great ways to save in the new year!

road trip, saving money, travel tips

How I Get Discounted (Or FREE!) Gas Every Time

How would you like to pay less than the posted gas prices every single time you visit the pump? Better yet, how would you like to get some road trip snacks and even the gas for FREE? Yes it’s possible. I would know; I haven’t paid the price that the gas station sign has indicated for a long time! Whether you want to make a road trip less expensive or want to save up for your next goal during your day-to-day commute, here’s how to do it:

Subaru Forester

Note: I typically use Kroger-brand gas stations (known regionally as Fred Meyer, Turkey Hill, etc.) because it turns out to be the cheapest for me locally. If your Kroger gas is for some reason expensive or you don’t live near one of their pumps, don’t worry. You can still apply most of these tips to get a good deal on gas near you!

Look Up Prices

Go to GasBuddy.com or open the GasBuddy app before you decide where you’re going to fill up. This service lists up-to-date gas prices at stations near you. When I’m at home, the cheapest place is typically either Fred Meyer or Costco, which are the only two gas stations I ever use! If you’re on a road trip, it’s helpful to know where you should fill up.

Now that you know where the cheapest pumps are, let’s knock some more money off that gas price…

Become a Member

Go to the customer service desk of Fred Meyer, King Soopers, Ralph’s, Baker’s, or any other store under the Kroger umbrella and ask to get a shopper rewards card. This is free to get and automatically gets you three cents off per gallon at most Kroger-owned gas stations. You can also sign up for a credit card that has a few more perks, but I think that the rewards card is a safer way to go, and if you follow the tips below, could ultimately give you more savings.

The rewards card isn’t just for three cents off. Every grocery store purchase earns you fuel rewards points. If you spend enough at the grocery store (and earn at least 100 points), you can get anywhere between ten cents and a dollar off at the pump! You can also download store coupons right onto this card.

I’m not as familiar with rewards policies for other gas stations, but it’s worth checking out as you can get some great deals. Sometimes, my Costco gas station is cheaper than my Fred Meyer gas station even after the three-cent discount. Since you have to show your membership card to get Costco fuel, that certainly has been worth it!

Use Your Receipt

Almost every Friday, Kroger-owned stores have a “Freebie Friday” coupon that you can download from the digital coupon section of their website. Even if you normally use a different grocery store, make sure to put this on your card and take advantage of the free item (you have three weeks to pick the item up from the store before the coupon expires). You don’t have to buy anything else to get this deal. Just scan the free item, scan your rewards card, and grab your receipt.

Make sure to take a good look at that grocery receipt because it can lead to even more gas savings. My receipt often says that if I go online and fill out a survey about my shopping experience, I will get 50 fuel rewards points. So after just two receipt surveys, I’m getting 10 cents off per gallon, and I didn’t have to pay a cent to do it! You can earn fuel points up to once a week, so get your weekly freebie and fill out its receipt survey to enjoy 20 cents off per gallon.

After following the above steps, you’ll really start to see some savings in your gas budget. For a while, these steps were all I did. But we’re just getting started!

Buy Gift Cards

I recently got involved with buying discounted gift cards online. My favorite website to go for this is Gift Card Granny. It’s basically a search engine for gift cards that shows you where you can get the biggest discount. I can usually get a 2-4% discount on grocery and gas cards. (For more frivolous stores, such as movie theaters and restaurants, the discount is usually more like 10-20% off!)

I normally buy my gas at Fred Meyer stations, but since Fred Meyer is owned by Kroger, I look up other Kroger-owned stores on GiftCardGranny to see what currently has the biggest discount. If you’re using another gas station, find out what other gift cards may also work there. (For example, if you buy gas at Safeway, also look up gift cards for Vons.) Once you receive your gift card, just make sure to use both your gift card and rewards card at every gas station visit.

Special! If you’ve never used Cardpool before, then use this link to get a bonus $5 off your first purchase!

Just in case you’re wondering, most discount gift cards sites verify the cards they sell and have a guarantee for all your purchases. I’ve never had a problem buying discount gift cards.

Once you add this tip to your routine, you should save several bucks on each fill-up. Are you ready to do one more thing to get FREE gas?

Use Your Computer or Smartphone To Make It FREE

If you read money-saving blogs, you’ve probably heard this before. But ever since I started to seriously use Swagbucks, my gasoline budget has become non-existent!

After signing up for Swagbucks, install a couple things onto your browser’s task bar. First, make Swagbucks your primary search engine. You’ll get paid for every few web searches. Also make sure to install the Swagbutton. If your shopping online, the Swagbutton will notify you about any coupon codes or rebates that your purchase qualifies for. These are the best ways to easily earn Swagbucks that won’t affect your daily routine, but if you’re interested, you can also fill out surveys, watch videos, play games, and more to earn Swagbucks!

Get a 300SB bonus when you sign up for Swagbucks here!

You can exchange your Swagbucks for a variety of gift cards. Swagbucks has gift cards to some gas stations, like Safeway, Sunoco, and Chevron. That’s an easy way to get free gas. However, I usually redeem my SB for a $25 or $50 prepaid Visa card. I then go back to GiftCardGranny and pay for my discount gift card with my free prepaid Visa card. You can also do the same thing by cashing out your SB into PayPal, but prepaid Visa cards usually give you more bang for your Swagbucks.

Other Ways to Save Even More On Gas

  • When shopping for a new car, look for one that has better gas mileage than your old vehicle.
  • Coast whenever you go downhill, need to slow down, or approach a stop sign. Basically, the less your foot is on the gas pedal, the better.
  • Can you limit your drives to work by doing something like working double shifts or working partly from home? Last December I changed my commute from 10 miles to one mile by moving closer!
  • Walk or bike when you can. As a bonus, you’ll exercise, get fresh air, and better enjoy the beauty of the route.
  • Try not to drive for just one thing. Combine your trips.5+ Ways to

This blog utilizes affiliate links.

day trip, Foodie

How I Was Part of a Guinness World Record

You won’t find my name in next year’s book of records, but over the past week I helped break a Guinness World Record. Here’s how it happened.

On Tuesday, I visited Harry & David. The world headquarters for this popular gift company is within walking distance of my home. (I even worked a season with them a few years ago.) Wolferman’s is a baking company that’s part of the Harry & David company.

April 10th is National Cinnamon Roll Day, a perfect day to attempt to bake the world’s largest cinnamon roll! After Wolferman’s/ Harry & David created a special oven that could cook a 1000+ cinnamon roll, they were ready to roll up the doughy, cinnamon-sugary goodness, heat it up, and offer tours. Harry & David normally offers factory tours, and the free cinnamon roll tour included parts of it. Unfortunately, photos weren’t allowed on this tour, but I couldn’t see the cinnamon roll anyway since it was still in the oven. That meant another trip to see the finished product this weekend.

Today was the main day of Pear Blossom Festival, a big event in Southern Oregon that also happens to be within walking distance from my home. A unique part of this year is the Wolferman’s booth selling slices of what Guinness World Records has declared the world’s largest cinnamon roll! The final weight was 1149.7 pounds, shattering the previous record by over 500 pounds! However, one of Guinness’ guidelines is to avoid food waste by making sure edible items are completely consumed. Pear Blossom was the perfect opportunity for lots of people to help out by eating pieces of the cinnamon roll. I got to help put the city of Medford, Oregon on the map with this world record, and the money raised from selling the pieces of cinnamon roll went to a local charity, so it helped the community in two ways!

Congratulations on a new cinnamon roll record. Although I don’t know how they plan to use the giant homemade oven in the future, a Harry & David tour is always fun whenever you pass through Medford. And if you’re here in April, stop for Pear Blossom!